
SAPLESTON is basically Stone Veneer made from Natural Slate Stone and having a thickness of 1.5-2.0mm !!!SAPLESTON is made using a special proprietary technology with which thin layers of 1mm thickness can be split from slate stone. Fibre Glass backing is fused onto the stone veneer’s backside to make the final product.With a total thickness of 1.5-2.0mm, SAPLESTON opens up new, Exciting and Unexplored Possibilities for all Interiors & Exteriors.
Application
SAPLESTON™ can be applied over: concrete, ceramic, wood, metal, plywood, fiberglass, backer board, tile, dry wall, painted surfaces, MDF, Masonite®, door skins, cabinetry and many other substrates as well.
Flexibility
SAPLESTON™ can be used the same way thin laminate type products are used. It will bend to a minimum radius depending on the stone color or type before cracking. With the assist of heat smaller radii can be achieved. Testing should always be done prior to any installation. It can be arched or bent inward or outward to meet a given look or architecture.
Fiberglass strand are used in the makeup of SAPLESTON™, which gives it strength and flexibility.
Installation
SAPLESTON installation can be easily done using many of the basic tools used in most tile work.

Preparation
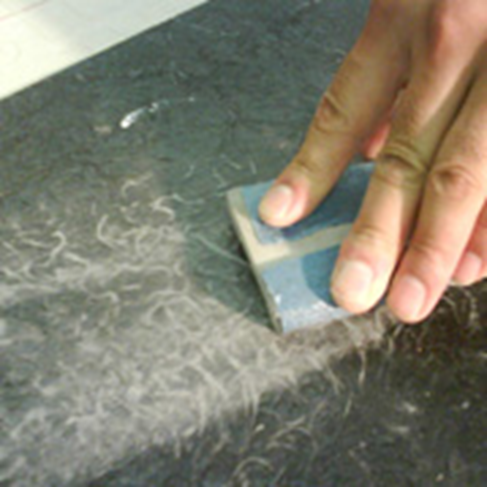
Prior to application it is best to clean, brush, and degrease any surface of dust or oils. Depending on the adhesive used, it may be necessary to prep the back of the SAPLESTON™ by sanding or scuffing the back to expose the fiberglass. Some adhesives may require the use of solvents or recommended primer by the adhesive manufacturer.
Layout & Patterns
Time spent preparing the work area will pay off in a job well done. Preparation of the area to be covered and the layout of the SAPLESTON veneer sheets is the same as for natural stones or tiles. A preliminary dry fit of SAPLESTON veneers allows for arrangements and orientation of individual sheets, patterns, textures, and colors before final placement.It is recommended that each sheet be dry fit exactly where it will be placed on all surfaces. Numbering the sheets to track relocation before cutting and trimming will save you time.
Tiling, Grouting & Joining
SAPLESTON™ can be also be used to create a tiled effect by leaving a grout jointbetween cut pieces. Sheets may also be butt joined for a minimal seam look.Due to the thin nature of SAPLESTON™ a narrower grout joint will produce better results. Test show the use of water based epoxy grouts work well to fill between the cut veneers. These epoxy grouts are also available in several colors to match the desired décor. On final clean up with a sponge, the epoxy will also seal and fill the SAPLESTON™ surface. If desired a deeper grout joint can be achieved by removing material just under the grout joint area.
Sealers
SAPLESTON™ can be sealed with the same sealers used for slate, stone tiles, and wood. There are many sealers on the market with various recommended applications. Please test any sealer for the desired luster and penetration required prior to installation.
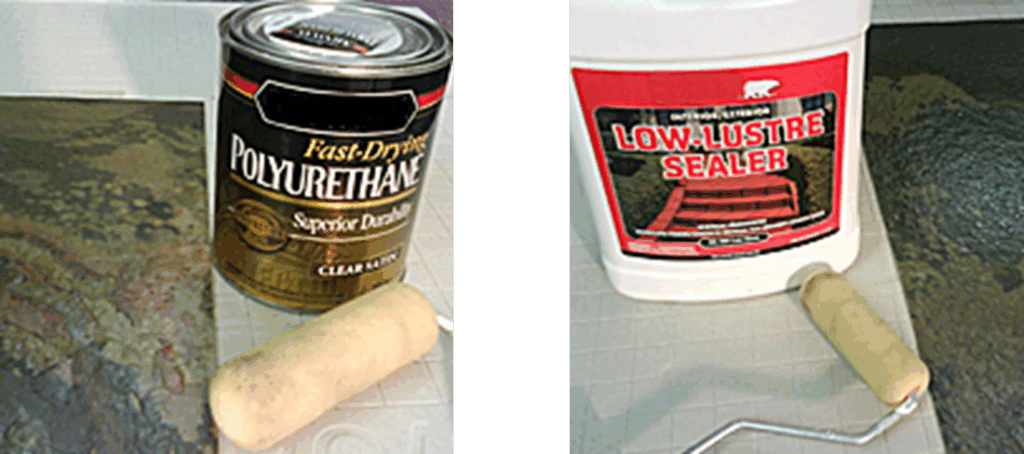
Pre-Sealing
Pre-sealing the SAPLESTON veneer sheets prior to installation will protect the face from adhesives and grout during installation and handling.
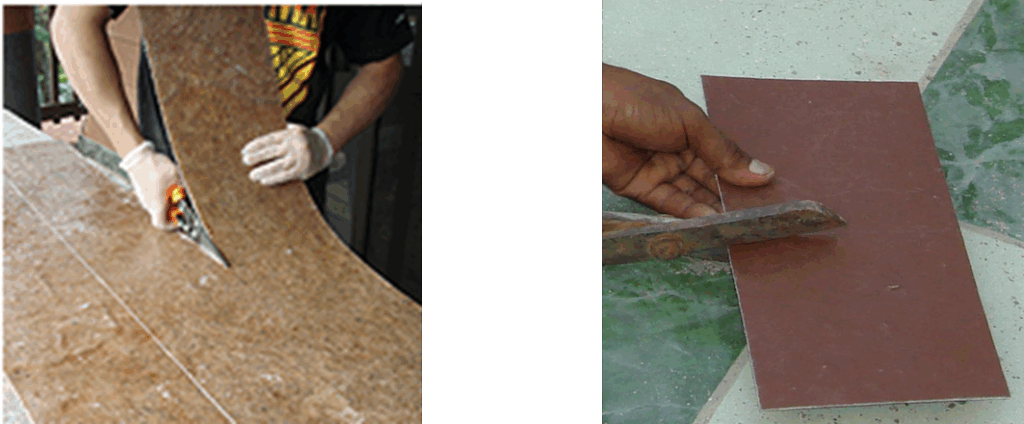
Cutting SAPLESTON
SAPLESTON can be cut with tin snips, a metal shear, wet saw, or table saw with carbide blade. Cutting curves is best done using long nosed tin snips.
Safety & Precautions
Precautions must be taken when working with SAPLESTON due to the fiberglass composition of the backing materials. ALWAYS use the proper type gloves, goggles, and dust mask when cutting SAPLESTON. When using a saw ALWAYS be sure to take proper precautions to cover skin, eyes and lungs from fiberglass dust. When cutting SAPLESTON properly filter equipment exhausts when cutting with saws, grinders, or sanders. AVOID BREATHING SILICA DUST. This product when cut, drilled, or abraded produces dust containing Free Silica which may cause cancer or delayed lung injury (Silicosis) if inhaled. Work outdoors, in a well ventilated area, or use mechanical ventilation. Industry standards recommend a NIOSH/MSHA approved respirator for this type of material. If in dusty areas or where airborne dust exceeds PEL wear NIOSH/MSHA approved respirator.
Adhesives
Know your adhesives; by understanding the specifics of any adhesives, much time and cost can be saved. All adhesives should be tested prior to any installation including consideration of moisture and temperature in the planned environment. If the application is outdoors, consideration to thermal expansion should be taken into account. Since SAPLESTON™ is only a veneer it must expand and contract The same as the substrate or delamination may occur. Where adhesive primers are recommended the bond should be test by the installer before final installation.
Recommended Adhesives
• Premixed grout and tile adhesive
• Acrylic copolymer based tile adhesive
• Polyurethane wood glues and PU construction grade adhesives
• Wood, parquet, and outdoor carpet adhesives
• Thick latex or acrylic latex type tile adhesive (use only where air drying can take place)
• Epoxy
• Silicone (with primer only)
• Construction grade multi-purpose adhesive, Liquid Nails® type.
• Polyester based gap filler putty (Bondo® type products)
The back of SAPLESTON™ veneers may require a filler type adhesive for some applications. The polyurethane wood glues work quite well for most applications to board materials by foaming slightly to fill gaps. These materials are not recommended for high moisture or wet application. For wet environments epoxies would be the best candidate. Contact adhesives are not recommended due to the uneven backing of SAPLESTON™.
Substrate
Since SAPLESTON™ is a water proof veneer consideration must be given to the substrate it is applied to. In some indoor and most outdoor applications expansion/contraction must be the same to prevent delamination. Concrete and masonry substrates must be at least 28 days old. Hydrostatic pressure conditions and vapor transmission cannot exceed 3 lbs. per 1,000 sq. ft. (1,36 kg per 92,9 m2) per 24 hours using a calcium chloride test (reference ASTM)
Trowels
For best results a 3/16” notched trowel is recommended for application of adhesive on substrate. It is always best to back-fill or back-butter voids or depressions in the material before application to a substrate. Use a straight trowel for back-filling of voids on the SAPLESTON™ sheets. For continuously wet environments epoxies or polyester resin are recommended and must be tested before final use.
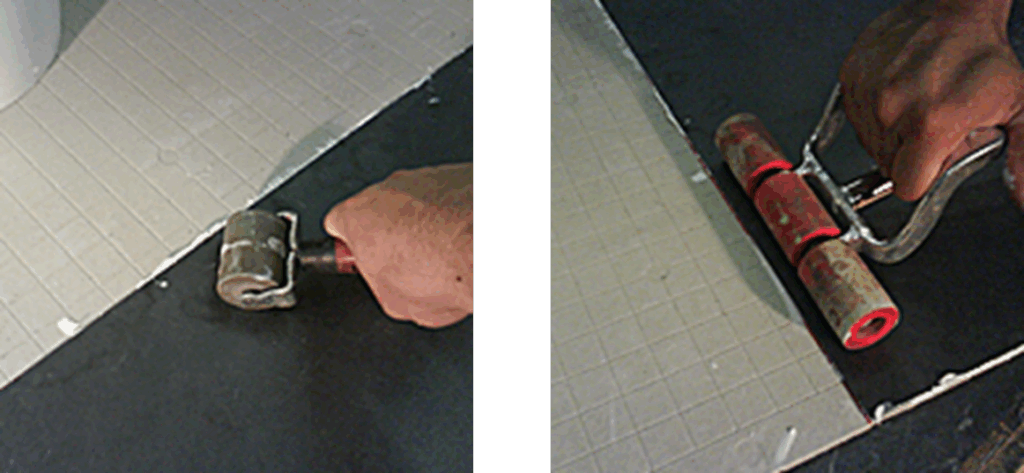
Hand Rollers
A hand roller is recommended to remove air between SAPLESTON sheet and substrate. To properly roll out trapped air start in the middle of a sheet while firmly rolling out towards the edge. Do not press too hard while rolling as this may cause too much adhesive to push out. Proper back-filling and good rolling techniques will result in a solid hard surface. Do not use non-catalyzing (water vapor type) cure adhesives where the substrate is a moisture barrier. Non- catalyzing adhesive will not cure properly if applied between non-porous materials.
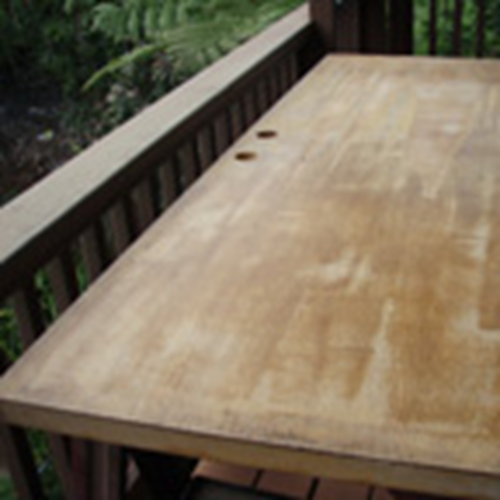
EXAMPLE OF INSTALLATION Of SAPLESTON – Natural Slate Stone Veneer Laminate On OLD DOOR
This project involved covering an old door with Silver Current SAPLESTON. Proper surface preparation is important. The surface was sanded and brushed clean before the SAPLESTON was installed.
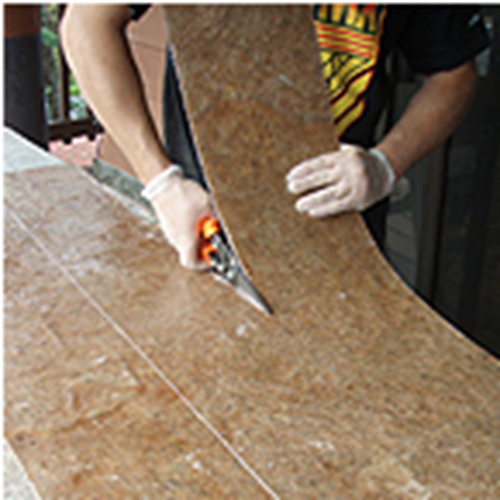
SAPLESTON is laid out and cut with sheet Metal shears. Cutting is simple because of SAPLESTON’s thin, flexible nature. Note the back of the material is scribed with a knife.
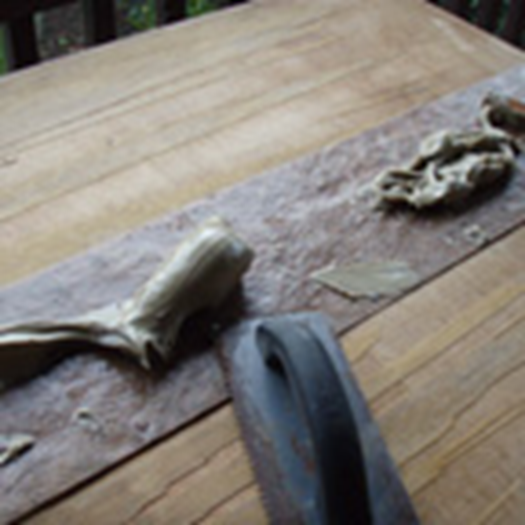
Adhesive is applied with a toothed trowel. This project used heavy-duty construction adhesive. Note some construction adhesives foam when moisture is present. Clamps can be used to prevent seperation or swelling.
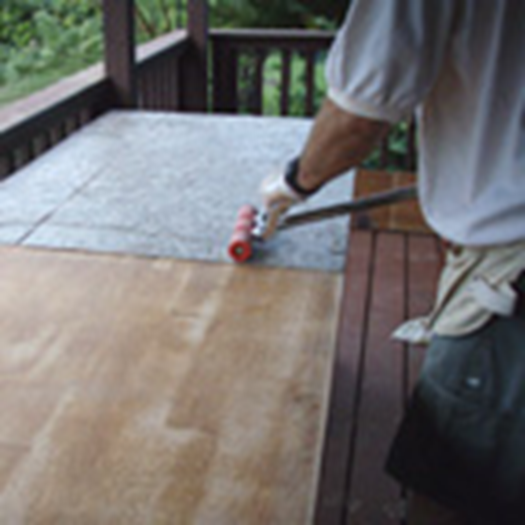
A roller is used to press down the SAPLESTON. Start from the middle to push air out towards the edges. Care must be taken not to push the adhesive out, or an air gap may form.
Note the grout lines have been cleaned with a scraper and filled with grout. Door knob and dead bolt holes have been cut with a hole saw.
